So it's Monday, December 2nd (Day One), at Autodesk University 2008. I arrived at the Venetian (the host hotel) around noon. I could immediately tell that many AUers had already arrived (evidenced by the numerous AU badges that could be seen hanging by a string around the neck).
As I continued my way toward the casino area, I recognized a familiar face. It was Scott McEachron. He gave me a hug and we chatted for a bit. Then I headed down the hall to look for AU registration area.
On the way to the registration area, there were several ladies with AU signs. They were very nice and helped point me in the right direction (since registration was not in the same location as last year).
As I was nearing the entrance to the registration area, I passed by Shaan Hurley. He was in an animated conversation with several other people. I wanted to say hello, but it didn't seem like a good time so hopefully I get another chance to speak with him while I'm here at AU.
I continued to registration and that went very smoothly. There was no line at all to access the registration computers, but if you looked closely, you would notice that there was a line for folks that had used the registration computers and were waiting to pick up their packets. I chose a row that only had one person in the packet pickup line and selected a computer to use.
The gentleman in my line was taking FOREVER asking questions after getting his packet. Finally another lady brought my packet to his left so that I didn't have to continue waiting. Everything I needed was in the packet including my badge, ribbons, and subscription t-shirt and information (though I won't be able to wear the t-shirt in public because it's an XL and I wear a Medium).
Autodesk seems to have really taken this recycle thing to heart because the bag to hold my stuff and the spiral notebook were made from recycled materials. Part of the bag is a different color or colors.
At this point, I took a quick peak at the contents of my packet. I was concerned that I did not receive tickets for subscription meals, so I went to visit with the Subscription Center FAQ folks. They politely explained that all I needed was my badge. COOL.
Next I went straight to the Marin mountain bike that was in the room (since I'm a mountain biker myself). It was at a sustainable design exhibit in the registration area. I completed the survey about sustainable design and gave them my contact info in case I win the bike (crossing fingers). Then I reviewed the sustainable design board and added my own idea for how to help improve sustainable design for the future. For this idea, I received my choice of metallic water bottles. COOL.
Then I made the trek through the buttons. I grabbed any that I thought applied or were funny including "Drafty" and "Got Work". There were so many from which to choose. Then I debated about printing my schedule, but I kept reminding myself that I already had a printout in my suitcase.
As I was about to leave the registration area, I noticed another familiar face. It was Lynn Allen. She was interviewing an AU attendee about his experience at AU so far. Though there was already a crowd gathering around her, and since I'm not real fond of cameras in the first place, I headed in the opposite direction.
Next I went to register at the Venetian. In case you've never been to Las Vegas or AU, there is a TON of walking. I made the trek to the hotel lobby and got in line, only to be sent around the corner and upstairs to a different registration area. I was told that many of the AU rooms had already been assigned and that not many others were ready for occupancy. I was given the choice of a handicap accessible room or a room with a "great view of the strip". The caveat was that the "room with a view" was an extra $25/day. No way, Jose. I declined the "room with the view" and went for the handicap accessible room. Though I would prefer the room be saved for those that need it, the accessible room was a great choice for me. In the elevator on the way up to the room, something occurred to me that proved correct. The accessible room was very close to the elevator. YEAH!
I dropped off my AU stuff then went for a walk down the strip looking for a place to eat. I settled on Outback Steakhouse (at the Coca Cola and M&M store, then I returned several hours later to get ready for the AEC BIM Mixer.
I had already spoken with Lisa Pohlmeyer and she was with some of the current and previous DC CADD employees. They were heading to the Mixer within the hour (though I thought that was a bit early).
I brought my stuff from the car to the room, took a shower, and got ready for the Mixer. I headed directly to the Sands Expo area and found the first AU information lady. She directed me to the fifth floor and up the escalators I headed. As I got off the escaltor, I noticed that a line was already forming. I thought that I had arrived too late and would have to wait for someone to leave before I could enter the room. Actually, I was just too early and ended up being near the front of the line when the room finally opened.
During my wait, I visited with several AU attendees that were near me in line. We even ended up at the same table after getting our meal and drinks. One gentleman was a Department of Defense employee and the other worked in the structural industry. We had a nice visit about our experiences with Autodesk products.
Later during the Mixer, I found Lisa P. and the DC CADD (now and then) crew. I visited with Lisa, Gabe, Mark Martinez, Scott Durham, and Matt Castelli. Before she left the mixer, Lisa introduced me to Angel Espinoza. I was thrilled to meet him and we spoke about what portions of Civil 3D 2009 were giving me the most issues (my response was pipes and feature lines for grading = crash, for ease of use the problem area = pipe labels).
I then left with Lisa, Scott, and Matt to go to the Venetian Food Court. T. J. joined us later from the MGM Grand. We all had quite a discussion on the economy, stocks, and iPhones before retiring to our rooms.
Well, that was Day One. I hope the classes I chose are great ones.
Tuesday, December 2, 2008


Thursday, November 6, 2008
What's Wrong With My Text?
In case you haven't experienced it yet, working with true type fonts in AutoCAD can sometimes be a challenge. Here's one such example:
A fellow employee sends me a PDF showing a line table that was created using text objects with Arial and ArialBold font styles (both are True Type Fonts). The line table was created in two parts, then copy/pasted together into one table. Here's a portion of the result:
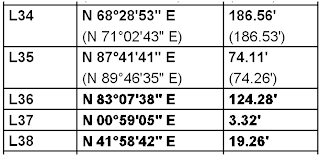
Notice that the Bold text in the first two lines (L34 and L35) is not as dark or thick as the bold text in the bottom three lines (L36, L37, and L38)? We tried using match properties to get the text to match, but the result is the same. That's unacceptable, right?
So here's the secret: The text on the bottom three lines (L36, L37, and L38) is at an elevation of -1.375 and the text on the top two lines (L34 and L35) is at an elevation of 0.
So the next time you are having issues with true type text, check the elevation of the text and maybe this will solve your problem.
A fellow employee sends me a PDF showing a line table that was created using text objects with Arial and ArialBold font styles (both are True Type Fonts). The line table was created in two parts, then copy/pasted together into one table. Here's a portion of the result:

Notice that the Bold text in the first two lines (L34 and L35) is not as dark or thick as the bold text in the bottom three lines (L36, L37, and L38)? We tried using match properties to get the text to match, but the result is the same. That's unacceptable, right?
So here's the secret: The text on the bottom three lines (L36, L37, and L38) is at an elevation of -1.375 and the text on the top two lines (L34 and L35) is at an elevation of 0.
So the next time you are having issues with true type text, check the elevation of the text and maybe this will solve your problem.
Monday, October 6, 2008
Image Plotting Issues
Today we had a repeat issue of plotting a sheet from paperspace that contained tiff images of a two page subdivision plat in model space. The preview looked correct, and everything on the sheet plotted except the two images of the plat. The Plot and Publish Details showed that the plot had been canceled though it wasn't the user that canceled it.
At this point, we decided it had to be computer specific. We contacted DC|CADD and Mark Martinez recommended that we uninstall and reinstall driver, plotter, etc. before proceeding any further. We got the same results (everything but the image was plotting) after the reinstall.
So, now we're thinking maybe it's a memory issue. We checked the system settings and the /3GB switch was not enabled on the problem computer. We changed the System Startup settings so that the /3GB switch would be enabled upon boot, then we rebooted the system.
After the reboot, the resulting plot contains everything on the sheet including the two images.
After the plot worked, we checked the size of the tiff images. (Yes, I know, why didn't we do that at the beginning.) Both images were under 300 KB. Hmmm, sounds small enough to me, but hey, I'm not going to look this gift horse in the mouth.
So, SCORE ONE FOR THE /3GB SWITCH!
- We plotted the layout to a different plotter with the same results.
- We plotted the layout to a DWF and the images appear as expected.
- We plotted the layout from a different computer and it plotted fine.
At this point, we decided it had to be computer specific. We contacted DC|CADD and Mark Martinez recommended that we uninstall and reinstall driver, plotter, etc. before proceeding any further. We got the same results (everything but the image was plotting) after the reinstall.
So, now we're thinking maybe it's a memory issue. We checked the system settings and the /3GB switch was not enabled on the problem computer. We changed the System Startup settings so that the /3GB switch would be enabled upon boot, then we rebooted the system.
After the reboot, the resulting plot contains everything on the sheet including the two images.
After the plot worked, we checked the size of the tiff images. (Yes, I know, why didn't we do that at the beginning.) Both images were under 300 KB. Hmmm, sounds small enough to me, but hey, I'm not going to look this gift horse in the mouth.
So, SCORE ONE FOR THE /3GB SWITCH!
Viewport Change Scale Lockup
Here's a quick workaround for an issue that has occured in a couple of Civil 3D 2008 drawings. The workaround was found by Matt Castelli of DC|CADD. Here's the deal:
We have a 2008 drawing that contains 8 or so xref overlays. Some of these xrefs have attached xrefs and most have at least one xref overlay. After creating a viewport in paperspace, the viewport scale was changed to 1" = 10'. It worked fine. Then the annotation scale dropdown was selected so that it could also be changed to 1" = 10'. That's when Civil 3D 2008 froze. The only solution was to kill the AutoCAD process tree.
The workaround is:
The long-term solution is to open all xref drawings and audit, purge reg apps, reset scale list, and detach missing xrefs. Most of this process can be achieved relatively quickly through two utilities released by Autodesk this year.
NOTE ADDED 10/06/2008: This drawing freezes in 2009 also
We have a 2008 drawing that contains 8 or so xref overlays. Some of these xrefs have attached xrefs and most have at least one xref overlay. After creating a viewport in paperspace, the viewport scale was changed to 1" = 10'. It worked fine. Then the annotation scale dropdown was selected so that it could also be changed to 1" = 10'. That's when Civil 3D 2008 froze. The only solution was to kill the AutoCAD process tree.
The workaround is:
- Unload all xrefs.
- Change the annotation scale.
- Reload all required xrefs.
The long-term solution is to open all xref drawings and audit, purge reg apps, reset scale list, and detach missing xrefs. Most of this process can be achieved relatively quickly through two utilities released by Autodesk this year.
NOTE ADDED 10/06/2008: This drawing freezes in 2009 also
Wednesday, October 1, 2008
Walk This Way, Talk This Way
I know, I know. I haven't posted in a while, but this particular subject is well overdue.
I'm sure you all know what it's like to get drawings that have objects in the wrong layer. So today I wanted to share with you an AutoCAD tool that might help you identify layering issues before you ever send the drawing to the client or start working with the drawing in your project.
The tool is called LayerWalk. The tool can be found in the AutoCAD LayersII toolbar. Or it can be accessed from the command line by typing laywalk and pressing enter.

After executing the command, a dialog box will appear that shows all the layers in the current drawing including xref layers.

By left clicking on any layer in the list, you can see what objects are on that layer. For us civil folks, it works great for checking the layers in a survey drawing before you start working with the file.

Unfortunately, it can work with Civil 3D objects if you set up your styles correctly. For example,create an alignment style with the alignment lines, arcs, and spirals on layer ALIGN. Now create an alignment object on layer WW-A-ALIGN. During execution of the layerwalk command, select only layer ALIGN, and you will see all the alignment linework in the drawing. If you select only layer WW-A-ALIGN, you don't see any alignment linework in the drawing.
On the other hand, create your alignment style with the alignment lines, arcs and spirals on layer 0. Now create an alignment object on layer WW-A-Align. During execution of the layerwalk command, select only layer ALIGN, then you don't see any linework. If you select only layer WW-A-ALIGN, then you see only the WW-A alignment linework.
Now don't forget to audit then purge your drawings (including regapps) and it just might brighten someone's day.
I'm sure you all know what it's like to get drawings that have objects in the wrong layer. So today I wanted to share with you an AutoCAD tool that might help you identify layering issues before you ever send the drawing to the client or start working with the drawing in your project.
The tool is called LayerWalk. The tool can be found in the AutoCAD LayersII toolbar. Or it can be accessed from the command line by typing laywalk and pressing enter.

After executing the command, a dialog box will appear that shows all the layers in the current drawing including xref layers.

By left clicking on any layer in the list, you can see what objects are on that layer. For us civil folks, it works great for checking the layers in a survey drawing before you start working with the file.

Unfortunately, it can work with Civil 3D objects if you set up your styles correctly. For example,create an alignment style with the alignment lines, arcs, and spirals on layer ALIGN. Now create an alignment object on layer WW-A-ALIGN. During execution of the layerwalk command, select only layer ALIGN, and you will see all the alignment linework in the drawing. If you select only layer WW-A-ALIGN, you don't see any alignment linework in the drawing.
On the other hand, create your alignment style with the alignment lines, arcs and spirals on layer 0. Now create an alignment object on layer WW-A-Align. During execution of the layerwalk command, select only layer ALIGN, then you don't see any linework. If you select only layer WW-A-ALIGN, then you see only the WW-A alignment linework.
Now don't forget to audit then purge your drawings (including regapps) and it just might brighten someone's day.
Subscribe to:
Posts (Atom)