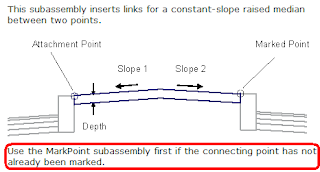
Well, for my first post, I'd like to show you the "secret" to getting the median subassembly to work as expected. So to get things started, let's create the assembly with everything but the median (I'll be using the "MedianRaisedWithCrown" subassembly) and the marked point (the "MarkPoint" subassembly). In this image, you'll see that I've placed the median and the marked point in the drawing but they are not currently attached to the "Lane with Median Assembly".

Now, the "secret" of getting the median subassembly to work correctly is in the order in which the median and marked point are added to the assembly. If you read the subassembly help for the "MedianRaisedWithCrown" subassembly, you will see that this subassembly requires that the "MarkPoint" subassembly be placed before the median subassembly.

We need to add the "MarkPoint" subassembly to the assembly. Before doing this, I will change the properties of the "MarkPoint" so that the Point Name and Point Codes are named something that makes sense to me. In this case, I used "Median-RT" for both.

Select the "MarkPoint" subassembly, right click, add to assembly. Select the circle at the back of the curb on the right side of the median.

Before I add the median subassembly to the assembly, I will change the properties of the median subassembly so that the Marked Point property matches the name I used for the "MarkPoint" subassembly, which in this case was "Median-RT".

Select the median subassembly, right click, add to assembly. Select the circle at the back of the curb on the left side of the median.

Well, that should do it for creating an assembly with a median. Now you might be asking yourself why I didn't just add the subassemblies directly from the Tool Palette. Unfortunately, that will have to be answered in a separate post.
===================================
Addendum (January 17, 2008)
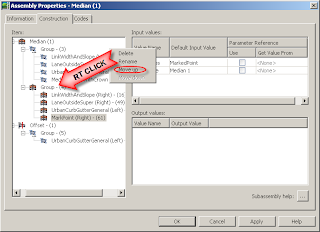
Thanks to Matt Castelli with The D|C|CADD Company for supplying this image and the following tip: If you already have an assembly built, but the median assembly doesn't seem to be working, move the group containing the median above the group containing the Marked Point. (Thanks, Matt!)

6 comments:
I'm trying to do this with Civil 3D 2009 and I cannot get it to work. My median will not link up with the marked point. Are there any changes in the 2009 program?
I don't know of any changes in Civil 3D 2009 that would keep you from attaching your median to a marked point.
As Matt stated, make sure the group containing the marked point subassembly is above the group with the median. If you only have one group in your assembly, then remove the median from the assembly and add it back so that the marked point subassembly gets placed before the median subassembly. You can verify this by looking at the order in which they appear in the group.
Think of it this way, you're telling the median to go find the marked point for its second attachment point. If the marked point hasn't been drawn yet, then that side of the median doesn't know where to attach itself.
Let me know if that suggestion doesn't help.
I tried that too and its still not linking. When I add the marked point to the back of curb, the marked point doesn't visually show up. Is it supposed to?
Whether or not you can visually see the Marked Point is dependent upon the settings in the code set style.
Will you send me a drawing that contains your assembly so I can take a look at it?
Please zip the drawing and send it to Civil3DHelpMePlease at gmail dot com.
in civil 3d 2011 don`t work. I tried that and nothing. help...
Anonymous: Have you contacted your reseller for assistance?
Post a Comment