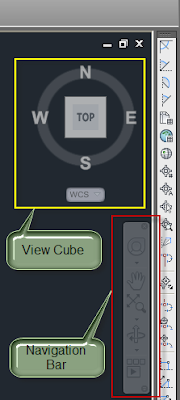
One of the first new things I noticed when I opened Civil 3D 2011 this week was the View Cube and Navigation Bar. While the View Cube is a really cool and useful tool, I don't use it the majority of the time, especially in a 2D view, so for me it's just taking up screen space.
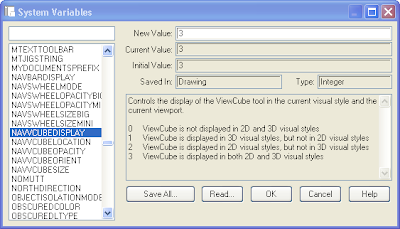
To figure out how to hide this thing (since I couldn't find an X to close it), I searched in the System Variables dialog box for a command to change the view options for this object. You can find the System Variable dialog box in the Tools panel on the Express Tools ribbon tab. I scrolled through the list looking for likely suspects and found some variables beginning with NAV.

If you select one of the system variables in the list, you'll see a description of what that variable controls and the values that can be set including a description of each option. The Initial Value for NAVVCUBEDISPLAY is 3. That means it is visible in both 2D and 3D visual styles. I figure I only want it to be visible in 3D visual styles so I need to change the New Value to 1 then select OK.
There is also a Navigation Bar that is visible just below the View Cube. You can access the View Cube, the Wheel, Pan, Zoom commands, Orbit commands, and Show Motion in this Navigation Bar. The Navigation Bar and View Cube both have transparency settings that you can control so that you can still see drawing objects behind the tool, you just can't select an object at a location that is within the bounds of the Navigation Bar or the View Cube, for example.
If you view your drawings from multiple views such as Top, Front, SW Isometric, etc., keep this View Cube visible and use it. It works very well and is intuitive to use. If you only draw in 2d or might view something in 3d maybe twice a year, then maybe you should go ahead and change the NAVVCUBEDISPLAY value to 0 or 1.
The Navigation Bar has a very small x in the top right corner that can be used to close the toolbar. You can also change the NAVBARDISPLAY system variable to 0 to hide it.
In summary:
NAVBARDISPLAY = 0 (don't display the Navigation Bar)
NAVBARDISPLAY = 1 (display the Navigation Bar)
NAVVCUBEDISPLAY = 0 (don't display the View Cube)
NAVVCUBEDISPLAY = 1 (display the View Cube only in 3D visual styles)
NAVVCUBEDISPLAY = 2 (display the View Cube only in 2D visual styles)
NAVVCUBEDISPLAY = 3 (display the View Cube in 2D and 3D visual styles)
One more thing before you go:
The settings I described in this post are drawing specific, so be sure and set them to your preferred setting in all your templates. You might even want the View Cube visible in some templates (such as those with surfaces or 3D objects), but not others (such as plan view only drawings). Thankfully, Autodesk gave us not only a great tool, but also flexibility with the view settings so let's use them as they were intended.
3 comments:
The on/off control is in tn the options dialog. Hit the 3D mModeling tab & in the lower left corner is Display View Cube or UCS Icon.
Thanks, Anonymous, though I still wish there was an "X" to close it or an icon to view/hide the thing like there is for snap and grid.
I couldn't get this to stick just by using the system variables. I tried "navvcube" (which gives an "on" or "off" option - the "off" option only turns it to "1" in the other command) and also "navvcubedisplay" as described here.
Every time I started the program, it was back! >:(
I had to use Anonymous's solution through the options.
Post a Comment