The materials and recordings for the 2012 Autodesk University classes have been posted. You can access the class list here:
You must have an AU account to access the classes. If you don't have an AU account, you can sign up for one here.
Since the announcement about this just went public, you may notice the website being a bit slow to respond. Just be patient because there are so many good classes available. In case you feel overwhelmed when you see the class listing, just refine your search such as Software: Civil 3D. There's even a filter for Language: Portuguese.
Enjoy!
Showing posts with label 2012. Show all posts
Showing posts with label 2012. Show all posts
Friday, January 18, 2013


Tuesday, December 13, 2011
Quick Tip about Importing Styles and Settings
If you're using Civil 3D 2012, you've hopefully already heard about the ability to Import Styles and Settings. This new command is a real time saver but be careful, because you may not be getting everything you want.
Here are a few things you won't get by using the Import Styles Command:
- Object Layer Settings (Use this workaround to transfer the settings to your current drawing)
- Blocks and Layers not used in styles (Use Design Center to import all layers and blocks)
- Description Key (Use old style drag & drop to import into your current drawing)
- Parts Lists (Use old style drag & drop to import into your current drawing)
Feel free to add comments for additional items that you find missing when you use the command.
Added Parts Lists per TimStalin's comment.
Friday, November 11, 2011
What's Missing In the World of Civil 3D Points? Not This!
Sure there are feature requests that we all have for Civil 3D points such as having full functionality of dynamic blocks within a point style, but this post is actually about what is no longer missing.
This morning I was asked how to find ranges of point numbers that were not currently being used in a drawing. In older versions of Civil 3D, one might have tried to look at the All Points point group properties for a list of points in that group. Well, now there's an easier way to get the answer.
Beginning with Civil 3D 2011, we were given this nifty new command:
LISTAVAILABLEPOINTNUMBERS
This command returns a list of point numbers that are not in use in the current drawing. Now you might be thinking that is a really long command name to remember but don't panic. Here's a how you can access the command:
So now you know one thing that is no longer missing from the world of Civil 3D points.
This morning I was asked how to find ranges of point numbers that were not currently being used in a drawing. In older versions of Civil 3D, one might have tried to look at the All Points point group properties for a list of points in that group. Well, now there's an easier way to get the answer.
Beginning with Civil 3D 2011, we were given this nifty new command:
LISTAVAILABLEPOINTNUMBERS
This command returns a list of point numbers that are not in use in the current drawing. Now you might be thinking that is a really long command name to remember but don't panic. Here's a how you can access the command:
- In Civil 3D 2011, at the command line, type LISTA then press tab then enter. Civil 3D will auto-complete the command for you.
- In Civil 3D 2012, at the command line, type LISTA then press enter (no tab key required). Civil 3D will auto-complete the command for you.
- In Civil 3D 2011 or 2012, select a Civil 3D point. On the COGO Point contextual ribbon tab, look for the COGO Point Tools panel . Left click on the bottom of that panel and a fly out will appear. Choose List Available Point Numbers from the list.


So now you know one thing that is no longer missing from the world of Civil 3D points.
Sunday, August 14, 2011
Taming a Feature Line Gone Bad
Feature lines in Civil 3D are incredibly versatile. You can use them for many purposes other than grading. Unfortunately, sometimes their complexity can cause problems.
What happens if one of your feature lines doesn't seem to be responding as expected? For example, what if I added an elevation point to a feature line that was part of a surface and even rebuilding the surface didn't show the elevation change. There could be several reasons for this including the possibility of the feature line being corrupt or maybe you deleted that point from the surface definition.
Whatever the issue may be, if you have a problem with a feature line, especially in conjunction with surfaces, give this a try:
What happens if one of your feature lines doesn't seem to be responding as expected? For example, what if I added an elevation point to a feature line that was part of a surface and even rebuilding the surface didn't show the elevation change. There could be several reasons for this including the possibility of the feature line being corrupt or maybe you deleted that point from the surface definition.
Whatever the issue may be, if you have a problem with a feature line, especially in conjunction with surfaces, give this a try:
- First of all save the drawing.
- Escape a few times then select the problem feature line.
- List the feature line. Make note of which site (typically Site 1) contains this feature line because you'll need it for future reference.
- Right click and select "Copy to Site..." or left click on Modify on the Feature Line Ribbon tab and select "Copy to Site..."

- Select the "Temp" site then OK.
If you haven't created the "Temp" site yet, select the drop down arrow on the Site icon then select "Create New"
  from the list. Name the new site Temp then OK. It should look something like this:

- Left click on the feature line you just copied and run the "list" command. Notice that the feature line you selected (the one on top of all others) is in the "Temp" site.
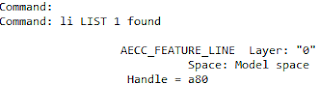
- Select the same feature line, right click, and select Display Order, Send to Back.

- Select the feature line that is now on top of the other objects and list it. It should be the original feature line in the original site (Site 1).
- Escape three times then select the feature line again and delete it from the drawing.
- Now select the feature line copy that is in the "Temp" site. If there are objects on top of the feature line, send them to back also.
- After selecting the "new" feature line, right click and select "Move to Site" or left click on Modify on the Feature Line Ribbon tab and select "Move to Site..."

- Select the site that contained the original feature line (Site 1).
- If the original feature line was part of a surface, select the feature line, right click and select "Add to Surface as Breakline"
 or left click on "Add to Surface as Breakline" on the Feature Line Ribbon tab.


Subscribe to:
Posts (Atom)