There are many ways to share surfaces between civil software packages. I prefer to use LandXML, but what if that isn't an option? What if the recipient wants the tin to be lines with 3d elevations?
If you export a Civil 3D surface to AutoCAD (or explode it twice), you are left with 3d faces. You can explode them as many times as you want, but you're still left with 3d faces.
Thanks to Google, I found the solution: Regions
In the AutoCAD drawing that contains the 3D faces, execute the region command and select the 3d faces. Now explode the regions that you created and you'll have lines with 3d elevations.
Yes, it's really that simple.
Thanks to Mike Perry for sharing his knowledge on the AUGI forums.
Friday, September 24, 2010


Wednesday, September 22, 2010
The Edit Geometry Panel...It's Not Just For Feature Lines
For those of you that haven't made the jump to Civil 3D 2011 yet, here's a tip for you.
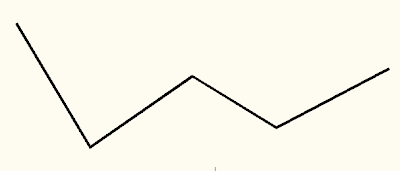
We'll start by drawing a polyline roughly in the shape of a W.
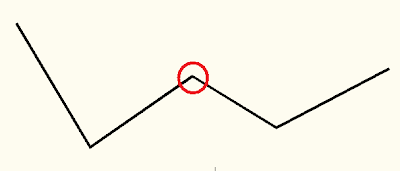
 We will now remove the PI inside the red circle.
 Select the Modify Ribbon Tab.
 Now locate the Edit Geometry Panel.
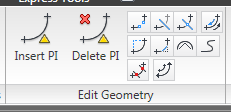
Left click on the Delete PI icon. The command line prompts you to "Select object:", so left click on the polyline to select it. The polyline you select will now have triangles at each PI. These triangles will be gray by default.
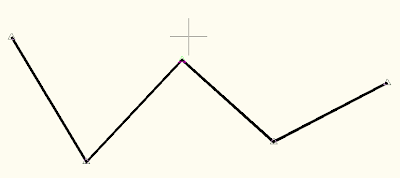
The command line now prompts you to "Specify point:". As you move your mouse near a PI, the gray triangle nearest to the mouse cursor turns green to indicate which PI will be selected.
Move your cursor inside the red circle and left click to select the PI you want removed. The selected PI will immediately be removed from the polyline.
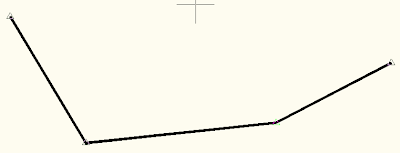 The Insert PI command works on polylines too. In fact, you can even insert PI's at a specific distance or at a specific increment along the polyline.
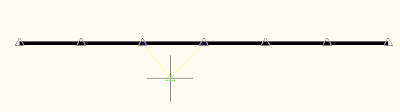 This command sequence works in Civil 3D 2011 too, but there are new enhancements with polylines in AutoCAD 2011 that you might prefer.
We'll start by drawing a polyline roughly in the shape of a W.
 We will now remove the PI inside the red circle.
 Select the Modify Ribbon Tab.
 Now locate the Edit Geometry Panel.
Left click on the Delete PI icon. The command line prompts you to "Select object:", so left click on the polyline to select it. The polyline you select will now have triangles at each PI. These triangles will be gray by default.

The command line now prompts you to "Specify point:". As you move your mouse near a PI, the gray triangle nearest to the mouse cursor turns green to indicate which PI will be selected.
Move your cursor inside the red circle and left click to select the PI you want removed. The selected PI will immediately be removed from the polyline.
 The Insert PI command works on polylines too. In fact, you can even insert PI's at a specific distance or at a specific increment along the polyline.
 This command sequence works in Civil 3D 2011 too, but there are new enhancements with polylines in AutoCAD 2011 that you might prefer.
Tuesday, August 31, 2010
Transfer Object Layer Settings Between Drawings
I found a nice "undocumented feature" in Civil 3D 2011 today. I found this totally by accident and though I lost a couple of minutes worth of changes to a template, I know that this find will save me a lot of time in the future, especially when a drawing is started from the wrong template.
One of the frustrating things about working with old drawings is that everything gets placed on Layer 0. Some of this can be corrected by using commands such as AECIMPORTSTYLES and AECCIMPORTSTYLESANDSETTINGS as posted by Scott McEachron of the I.II.I consortium. I haven't had great success with those commands yet, but as Scott stated, the commands are undocumented and unsupported.
Well here's another undocumented and unsupported feature (some might even call it a bug):
You can copy the Object Layers settings from one drawing to another...in seconds...FOR FREE! Want to know how? Here you go:
Before you begin, I will state that I'm using Civil 3D 2011 on the Windows 7 64-bit OS. I can't guarantee that it will work on older versions of Civil 3D or on a different OS.
I'm interested in hearing if this trick works on older versions of Civil 3D and/or other operating systems, both 32-bit and 64-bit so please leave me a comment.
One of the frustrating things about working with old drawings is that everything gets placed on Layer 0. Some of this can be corrected by using commands such as AECIMPORTSTYLES and AECCIMPORTSTYLESANDSETTINGS as posted by Scott McEachron of the I.II.I consortium. I haven't had great success with those commands yet, but as Scott stated, the commands are undocumented and unsupported.
Well here's another undocumented and unsupported feature (some might even call it a bug):
You can copy the Object Layers settings from one drawing to another...in seconds...FOR FREE! Want to know how? Here you go:
Before you begin, I will state that I'm using Civil 3D 2011 on the Windows 7 64-bit OS. I can't guarantee that it will work on older versions of Civil 3D or on a different OS.
- Create a drawing from a template that contains the correct Object Layer settings. I'll call this drawing "TEMPLATE".
- Now open a drawing that doesn't have the correct Object Layer settings. I'll call this drawing "BLANK".
- Make Toolspace visible (type showts at the command line or locate the toolspace button on the Home Tab of the ribbon).
- Select the Settings tab on the Toolspace palette.
- Set the view dropdown to Master View.

- Make sure that the "BLANK" drawing is current (it's shown at the top of the list in the Settings tab).
- Now scroll down until you see the "TEMPLATE" drawing in the Settings tab.
- With your cursor positioned over the "TEMPLATE" drawing name, right click and select Edit Drawing Settings... from the list.

- Select the Object Layers tab and verify that these are the object layers that you want used in the "BLANK" drawing.
- Now all you have to do is left click on OK.


I'm interested in hearing if this trick works on older versions of Civil 3D and/or other operating systems, both 32-bit and 64-bit so please leave me a comment.
Tuesday, August 3, 2010
Trim and Extend. Can’t we do both?
Surely this has happened to you at least once or twice. You run the extend command, but there’s at least one object that needs to be trimmed, not extended. Maybe you ran the trim command and needed to extend a line instead. Never fear because the Autodesk programmers have designed AutoCAD to be multi-talented (thanks guys and gals at Autodesk).
What’s the secret? You can hold the shift key while selecting an object and AutoCAD will run the other command on the selected object.
Here’s an example:
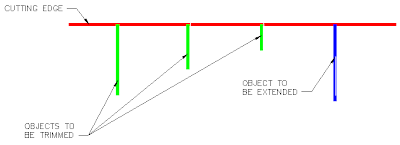
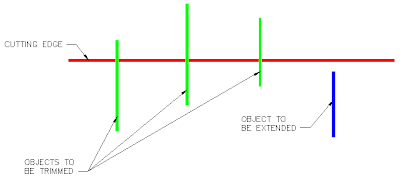 In this image, the red line will be the “cutting edge”. I will trim the green lines and extend the blue line.
At the command prompt, type trim and press enter (or use the trim command found on the Modify ribbon tab in the Modify panel).
When asked to select the cutting edges, left click on the appropriate object(s) or just press enter to select all objects. In our example we’ll select the red line as the cutting edge.
When you are done selecting cutting edges, press enter to continue the command.
At this point, the command line prompts you to “Select object to trim or shift-select to extend…” so we’ll left click on the three green lines to trim them. Now the drawing looks something like this:
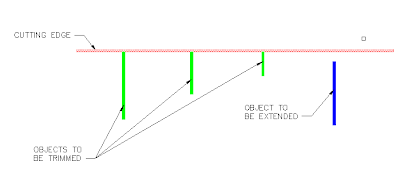
To execute the trim command, just hold the shift key while you select the object(s) to be extended. In our example we’ll select the blue line.
One more enter to end the command and the process is complete, using only one command to do two different tasks.
Here’s the final product:
 In case you're wondering, this method has been available for several versions of AutoCAD. I guess it pays to read the command line once in a while, even if it is a command that you run all the time.
What’s the secret? You can hold the shift key while selecting an object and AutoCAD will run the other command on the selected object.
Here’s an example:
 In this image, the red line will be the “cutting edge”. I will trim the green lines and extend the blue line.
At the command prompt, type trim and press enter (or use the trim command found on the Modify ribbon tab in the Modify panel).
When asked to select the cutting edges, left click on the appropriate object(s) or just press enter to select all objects. In our example we’ll select the red line as the cutting edge.
When you are done selecting cutting edges, press enter to continue the command.
At this point, the command line prompts you to “Select object to trim or shift-select to extend…” so we’ll left click on the three green lines to trim them. Now the drawing looks something like this:

To execute the trim command, just hold the shift key while you select the object(s) to be extended. In our example we’ll select the blue line.
One more enter to end the command and the process is complete, using only one command to do two different tasks.
Here’s the final product:
 In case you're wondering, this method has been available for several versions of AutoCAD. I guess it pays to read the command line once in a while, even if it is a command that you run all the time.
Tuesday, June 1, 2010
Raster Design OE 2011 has been posted
Thanks to James Wedding for announcing to all his loyal Twitter followers that the Raster Design Object Enabler for 2011 has been posted. There are different installation files for 32 bit and 64 bit operating systems so make sure you install the correct one.
Subscribe to:
Posts (Atom)