A blog about AutoCAD and AutoCAD Civil 3D for civil engineering professionals.
Sunday, January 27, 2008
Free Video Tutorials
Check out the youtube website and search for "Civil 3D". Today, I received 28 results. (If you put "" around the phrase, it will remove videos about the civil war or civil disputes.) The subjects range from CUI, styles, surfaces, corridors, render.
You can also try searches for other software such as "AutoCAD", "AutoCAD 2008", "Excel", etc.
Saturday, January 26, 2008
Where, Oh Where, Did the Xref Toolbar Go?

Unfortunately, this usually appears right where you're trying to edit your block. Now I know your first instinct is to hit the x at the top right corner and get that toolbar out of the way. However, when you finish editing your block you no longer have that cute little icon to click and "Save Reference Edits".
So what happens when you no longer have this toolbar? Well, you have two options: make the toolbar visible again or use the command line.
One way to make the toolbar visible, is to right click in the area underneath the menus where there are no tools or toolbars. Then select "ACAD" and "Refedit" to make the Refedit toolbar visible.
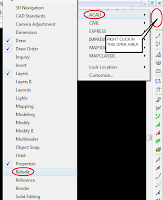
The second option is just to type refclose then press enter at the command line. You will receive this prompt:
Enter option [Save/Discard reference changes]
Just press enter to save the reference changes or D then press enter to discard the reference changes.
Friday, January 18, 2008
Which Way is North?
For many land surveyors, if you mention changing the UCS to anything other than "World" they just might turn as white as a sheet from fright. But you don't necessarily have to change the UCS to get everything "rotated" to fit on a page when plotted.
The first thing you need to do is determine what rotation is going to work best for the project. In this example, I selected the southeastern boundary line. I ran the distance command (di) selecting the south corner first and the east corner second (it doesn't matter if there are PI's in between the two points you select). The resulting angle was 20.54949537 degrees.
Command: di DIST Specify first point: Specify second point:
Distance = 3304.9159, Angle in XY Plane = 20.54949537, Angle from XY Plane =
0.00000000
Delta X = 3094.6218, Delta Y = 1160.0797, Delta Z = 0.0000
Now obviously, that angle is going to be a bit difficult for me to remember, so let's pick an exact angle near that number that will be easier to remember like 20 degrees.
The next step is to get the view rotated. We'll do this by using the dview command. At the command line, type dview and press enter. The command line will prompt you to select objects. You can select some of the objects (such as the boundary line) that will be visible during the dview command, you could type all to make all things visible during the dview command, or you could just press enter for the default "DVIEWBLOCK". The DVIEWBLOCK option will just show a block during the dview command.

The next command prompt is:
[CAmera/TArget/Distance/POints/PAn/Zoom/TWist/CLip/Hide/Off/Undo]:
At this prompt, type tw and press enter.
Specify view twist angle <0.00>:
Here's where you have to remember that big long number (or the easy to remember number 20). The only tricky part is that you have to use the negative of the number you were supposed to remember.
Specify view twist angle <0.00>: -20
Your drawing should now look like this:

What is most noticeable at this point is the fact that your cursor is still rotated to World but your view is not. Because of this, your cursor will now change from white (or whatever default color you use) to green for the y-axis and red for the x-axis. You can change this by setting the snapang variable to the negative of the twistview angle.
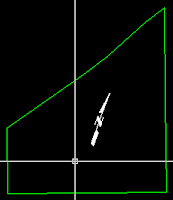
Type snapang and press enter at the command prompt. When prompted for the angle, type 20 and press enter. Now you should see something like this:
The Good, The Bad, and The Ugly
THE GOOD: The coordinates will be the same as they were before you changed the viewtwist angle and ortho will now be in relation to the new snapang angle (as evidenced by the polyline being drawn in this image.

THE BAD: Now try placing text. Unfortunately, it defaults to a zero rotation based on the current UCS which is world. No problem, just one extra step when placing the text. After you pick the "first corner", type R for rotation and give it the original angle value (20). That was easy enough right?
THE UGLY: Now try placing an mleader. No option for rotation, huh? Well, to the best of my knowledge, your options are to rotate the mleader the 20 degrees after placement or change your ucs to view. Just don't forget to reset your ucs back to world before continuing.
Oh yeah, and for you designers out there, trying to create a quick profile with the UCS set to view will get you nothing, literally.
Sunday, January 13, 2008
Quick Profile Your Way to a Better Surface
First of all, you only need one thing to create a quick profile: a surface. At the command prompt, type createquickprofile and press enter. At this point, you'll be given this prompt:
Select object or [by Points]:
(Remember I said all you needed was a surface?) If you don't have a specific object to select, just type p and press enter to select the "by Points" option. Now you can begin picking points on the screen for this quick profile.
When you're done selecting points, just press enter to exit the point selection process. A dialog box will appear that shows all the available surfaces in the drawing, including corridor surfaces.
There is a check box for "Select all surfaces" near the top of the dialog box. If you want profiles for all the surfaces on the list, just make sure this box contains a check mark. If you only want a few of the surfaces and there are many in the list, then uncheck the "Select all surfaces" box, and left click in the box under the "Select" column next to the surface(s) for which you want profiles created.
There is also a column for "Profile Style". You can select different styles for different surfaces.
When you're done selecting surfaces and setting the profile styles for each, just left click the OK command button at the bottom of the "Create Quick Profiles" dialog box. At this point, you will be given the option to "Select profile view origin:". Select a point on the drawing (preferably away from the rest of the drawing) for the profile view to be placed. The profile origin will be the lower left corner of the quick profile view grid.
Don't be surprised if the Panorama window appears with a new event in the event viewer. It is just an information event telling you that a quick profile has been created and that the quick profile "is a temporary object and will be deleted on save command or on exit from drawing".
To clear the events from the Event Viewer list, left click on "Action" in the menu items at the top of the Event tab of the "Panorama" palette and select "Clear All Events". To close the Event Viewer, left click on the
 near the top right corner of the Event tab window.
Now, my problem with this method is that, while the quick profile, looks great, I can't reuse it for another part of the surface. To do this, I'll need to use an object such as a 2D line, 3D line, 2D polyline, or 3D polyline, lwpolyline, an arc (even though it's not listed in the help file), a feature line, a parcel line, or a survey figure.
The quickest way to determine if an object can be used to create a quick profile is to select it, then right click to access the right click menu. If you see a listing for Quick Profile, then just select it and follow the prompts.
So here's how I use this tool on a surface:
- Draw a polyline across a section of your surface.
- Select the polyline, right click, choose "Quick Profile..."
- Place your profile away from the rest of your drawing in model space.
- Create two viewports to show plan and profile.
- Now just grip edit the polyline and you'll see an updated profile view of the new location of the polyline.
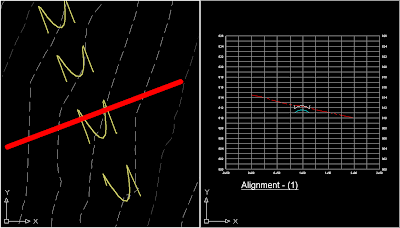
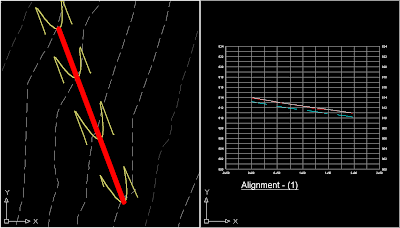
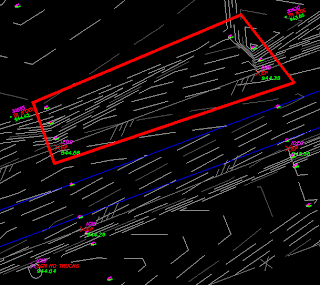
One more quick tip before I go. A quick way to check an existing ground surface is to set the contour interval to something very small like 0.1/0.5 ft. Even though the final product is 1' contours, this could help you identify possible problem areas such as the missing breaklines shown in this image.
I hope you find quick profiles as helpful as I do.
Technorati Tags:
[Civil 3D] [Surfaces] [Tutorial] [Profiles] [Profile Views]
Saturday, January 12, 2008
Become an AutoCAD Power User #1
- What the heck does this icon represent?
This icon is usually found in the options dialog box and it is used to indicate that a setting is drawing specific. For example, "Retain changes to Xref layers". - Items in (Parenthesis) help define the command such as:
"Select up slope part in plan (Pipe or Structure):" which means you can select either a Pipe or a Structure for this command. - When a command has different options, the options will be appear in brackets with capital letters for the hot key such as:
"Specify next point or [Arc/Halfwidth/Length/Undo/Width]:" which means you only have to type A and press enter to change to Arc mode while drawing a pline. - When you see a value or command in
, that is the default value that will be used if you just press enter. For example:
"Specify view twist angle <0.00>:" Pressing enter at this prompt will default to the value of 0.00. - Holding shift with ortho OFF, will result in a temporary ortho ON state. Holding shift with ortho ON, will result in a temporary ortho OFF sate.
- Learn those default aliases for common commands such as:
- a (arc)
- c (circle)
- co (copy)
- l (line)
- li (list)
- m (move)
- mt (mtext)
- op (options)
- rea (regenall)
- ro (rotate)
- pe (pedit)
- pl (polyline)
- rec (rectangle)
- spl (spline)
What Happened to my Workspace?
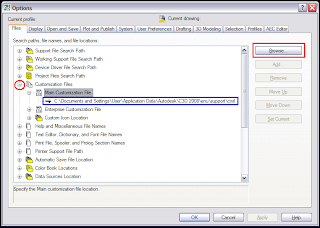
Here's how to verify which CUI file is being used and how to change it if necessary:
- At the command prompt, type options and select the Profiles tab.
- Under the "available profiles:" list, verify that Current profile: (at the top of the dialog box) is set to the correct profile.
- If the correct profile was already current, then select the Files tab.
- Under the heading of "Customization Files", select the
next to "Main Customization File" (red circle) and check which file is being used (blue rectangle).
- If you're expecting to see "...civil.cui" but you don't , then left click on path below "Main Customization File" (blue rectangle) and then select the "Browse" command button (red rectangle) on the right.
- The default location for the cui files in Civil 3D (Windows XP) is at
C:\Documents and Settings\User\Application Data\Autodesk\C3D 2008\enu\support\
where "User" is your "user name" on that computer.
Pipe Network Recovery
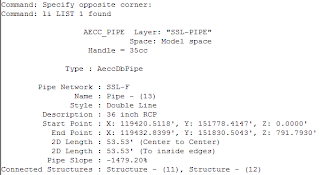
Unfortunately, the answer from Autodesk web support is usually that you'll have to go to a backup or rebuild the pipe networks from scratch. Well, I found something this week that might help the process of re-creating those pipe networks.
If you list one of the corrupt pipes, you'll notice that there is no "Pipe Network" reference in the "corrupt" pipe. The first image is a sample of a "good" pipe, the second image is a sample of a "corrupt" pipe.

You could use the plan set (if you have one already) to recreate the pipe network, but if you don't have one, here's another way.:
Create a pipe style that shows only the Plan Pipe Centerline and the Plan Pipe End Line. Also create a pipe label style that shows the inside pipe diameter. The pipe ends will assist you in knowing where the pipes begin and end and the centerline will give you an elevation for the pipe. You should also label the structures so that you'll know which one to place.
Now you can create the pipe network by layout snapping to the endpoints of the pipe centerline for elevation and changing the pipe sizes as necessary based on the inside pipe diameter label.
Obviously, this isn't a cure-all and it will still take some time to complete, but hopefully it might help you get back up and running a little bit quicker.
Rotate Your World

Our mission is to rotate OBJ. Z (the red polyline) around point A so that line BC is parallel with line DE (the yellow polyline).
- Execute the rotate command.
- At the prompt (Select objects:), select the red polyline that represents OBJ. Z, then press enter to accept.
- At the prompt (Specify base point:), select the endpoint at point A.
- Type R and press enter to accept. (R is used to access the "Reference" option of the rotate command.)
- At the prompt (Specify the reference angle <##>:), select the endpoint at point B then the endpoint at point C.
- At the prompt (Specify the new angle or [Points] <##>:), Type P and press enter. (P is used to access the "Points" option of the rotate command. This option allows us to select the new bearing for line BC by selecting two points.)
- Select the endpoint at point D, followed by the endpoint at point E.
This process could be used in many situations such as rotating a land survey based on assumed coordinates. The whole survey would be "OBJ> Z" and the basis of bearings would be line DE.
The scale command has the same Reference and Points options. Be sure and look for options on other commands. You'll find them in brackets.
Be cautious about using objects with elevation. In the case of rotate, the z value might have no effect, but having different z values when scaling might give you unexpected results.
NOTE: Although the align command will also rotate an object to another line based on points, it also moves the object. The workflow shown here keeps the object in its original location rotated around the point of your choosing.
Wednesday, January 9, 2008
Take Control of Your Double Clicks
Editing Note Labels-Right Click No More!
That post inspired me to go crazy with creating double click text edits for Civil 3D labels. I created all of them in the civil.cui file then transferred them to a custom.cui file for others to use. Of course now I'm very spoiled about double clicking any Civil 3D label that allows editing such as sag and crest curve labels in profile views.
Well, today I was editing some dimension text and I tried the double click thing but nothing happened (because I keep the properties palette open on my second monitor). I grumbled, typed ed and pressed enter to make my edits.
As I was working on my third or fourth dimension text edit, I remembered Dominick's post and something occurred to me: Why not just change the default double click action for a dimension?
So I popped open the cui and did just that. Now I'm back to working efficiently with my double click text edits.
Here's how I made the change:
- Open Civil 3D and make sure that your current workspace is saved.
- Execute the CUI command to access the Customize User Interface dialog box.
- In the dropdown list box at the top left section of the dialog, select "acad.cui"
- Left click on the
next to Double Click Actions.
- Scroll down and left click on the
next to "Dimension".
- It is currently set to "Properties" but we need to create a new command for it.
- Click on the "create new command" star near the middle of the dialog.
- Now on the right side of the CUI dialog, you can find the properties of the new command "Command1".
- Change the Command Name to "Edit Text".
- Change the Macro from "^C^C" to "_ed;".
- Back on the left side of the CUI dialog, left click and hold on "Edit Text" under the Command List.
- Drag the command until your cursor is directly on the word "Dimension" in the acad.cui double click list.
- When you release the left click, the "Properties" command will be replaced by your new "Edit Text" command.
- Left click on the save icon
next to the cui dropdown list, Apply, and OK.
Now go double click a dimension and make sure it works. Don't forget to make other changes as well, such as double clicking a line could be pedit;y;j; for pedit, convert to pline-yes, then j for join (optional).


